vim file +54
open file and go to line 54 any : command can be run using + on command line
vim -O file1 file2
open file1 and file2 side by side
:qa close all windows add trailing ! to force
undo/redo
u undo
Ctrl+r redo
. repeat
navigation
gg Goto start of file
G Goto end of file
search/replace
/regexp searches forwards for regexp ? reverses direction
n repeat previous search N reverses direction
* searches forward for word under cursor # reverses direction
:%s/1/2/gc search for regexp 1 and replace with 2 in file c = confirm change
:s/1/2/g search for regexp 1 and replace with 2 in (visual) selection
:%s/^[\ \t]*\n//g # replace all the empty lines
:5,12s/foo/bar/g # changes each 'foo' to 'bar' for all lines between line 5 and line 12.
:.,$s/foo/bar/g # changes each 'foo' to 'bar' for all lines between the current line (.) and the last line ($).
windows
:e set buffer for current window you can optionally specify a new file or existing buffer number (#3 for e.g.). Note if you specify a directory a file browser is started. E.g. :e . will start the browser in the current directory (which can be changed with the :cd command).
:sp new window above ditto
:vs new window to left ditto
:q close current window
:qa close all windows add trailing ! to force
Ctrl+w {left,right,up,down} move to window
Ctrl+w Ctrl+w toggle window focus
Ctrl+w = autosize windows to new terminal size for e.g.
:ba new window for all buffers ":vert ba" tiles windows vertically
Showing posts with label Linux. Show all posts
Showing posts with label Linux. Show all posts
Sunday, February 20, 2011


Tuesday, June 30, 2009
How to check a file's encoding under Linux
Use the following command:
file $file_name
For example:
$ file cn.txt
cn.txt: UTF-8 Unicode text, with CRLF line terminators
file $file_name
For example:
$ file cn.txt
cn.txt: UTF-8 Unicode text, with CRLF line terminators
Monday, June 29, 2009
How to add printer to your Fedora in School of Computing of NUS
Open the menu System -> Administration -> Printing
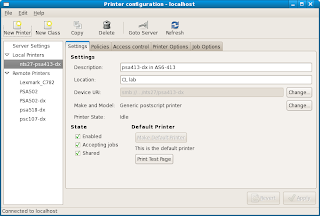
Press the New Printer button
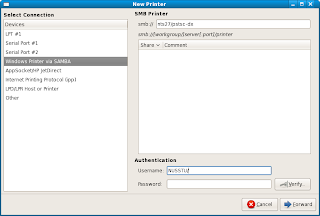
And select "Windows Printer via SAMBA"
Input the smb address "nts27/pstsc-dx" ( if you are a student of SoC and the printer name "pstsc-dx" is the one in Level 1 of COM1)
Then press Forward button
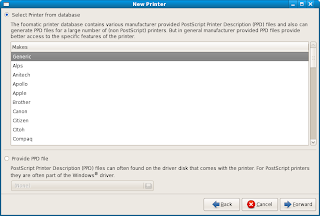
You can directly use the "Generic" and click the Forward button.
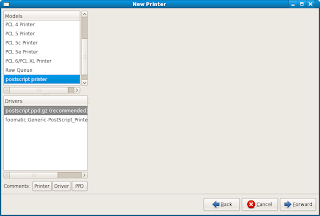
Choose the "postscript printer" and press Forward
And then enter the name displayed on your computer of the printer, and press Forward button.
Click Apply button.

Press the New Printer button

And select "Windows Printer via SAMBA"
Input the smb address "nts27/pstsc-dx" ( if you are a student of SoC and the printer name "pstsc-dx" is the one in Level 1 of COM1)
Then press Forward button

You can directly use the "Generic" and click the Forward button.

Choose the "postscript printer" and press Forward
And then enter the name displayed on your computer of the printer, and press Forward button.
Click Apply button.
Sunday, June 28, 2009
How to: Install Flock with Adobe Flash Player on Fedora
FWD from:
http://fabdango.net/2009/05/how-to-install-flock-25-with-adobe-flash-player-10-on-fedora-11-leonidas-without-using-the-terminal/
And I add some additional information.
In the following tutorial I’ll show you how to install Flock, the social web browser, and how to enable Adobe Flash player on Fedora 11. The guide is Flock 2.5-Fedora 11-GNOME specific but it should basically work for any Mozilla-based web browser on any Linux distribution using any desktop environment. You can achieve this without even using the terminal or any command line.
1. First, you’ve to get Flock from its official download site. It’s a compressed file (.tar.bz2) containing the full application. It’s enough for running it but it’s not an installer. Save it anywhere you want. You can use the following command to decompress the compressed file:
tar -xjvf flock-2.0.3.en-GB.linux-i686.tar.bz2
2. Once you saved Flock, extract the file where you want the program to be located. I did it at /home/fabian/Software/flock
3. At this very moment you should be able to run Flock just by executing the /flock/flock-browser file, but you won’t have any shotcut to it and won’t be able to show flash content.
4. Next step is to get Adobe Flash Player from its official download page at Adobe.com. Select the .tar.gz file for Linux and save it in your computer. You can use the command as follows to decompress the file:
gzip -d install_flash_player_10_linux.tar.gz
tar -xvf install_flash_player_10_linux.tar
5. Open the file you’ve just download and extract the libflashplayer.so file to /flock/plugins/ for enabling the flash player. It also works if you extract it to /home/user/.flock/plugins
6. The previous step should be enough for making everything work fine, but truth is that Flock will crash. As soon as you load any flash content, the browser will close. This is because the libfreebl3.so library included by Mozilla doesn’t work properly. For solving this, you must go to the folder containing Flock (/folder-you-chose/flock/) and delete the libfreebl3.so file. This will foce the application to use the file included by Fedora, located at /lib/libfreebl3.so, so it won’t crash. This is enough for making Flock play flash content. Next steps will show you how to add nice shortcuts to your desktop.
7. Right flick the Applications menu at the GNOME panel. Select Edit menus. At Aplications -> Internet select New Item. Type: Aplication;
Name: Flock;
Location: /folder-you-chose/flock/flock-browser;
Comment: The social web browser (that’s optional, of course).
About the icon, I suggest this one.
Finally, click OK and you’re done, Flock will be at your applications menu. For creating shortcuts on the GNOME panels or desktop, just drag and drop the entry you’ve just created.
http://fabdango.net/2009/05/how-to-install-flock-25-with-adobe-flash-player-10-on-fedora-11-leonidas-without-using-the-terminal/
And I add some additional information.
In the following tutorial I’ll show you how to install Flock, the social web browser, and how to enable Adobe Flash player on Fedora 11. The guide is Flock 2.5-Fedora 11-GNOME specific but it should basically work for any Mozilla-based web browser on any Linux distribution using any desktop environment. You can achieve this without even using the terminal or any command line.
1. First, you’ve to get Flock from its official download site. It’s a compressed file (.tar.bz2) containing the full application. It’s enough for running it but it’s not an installer. Save it anywhere you want. You can use the following command to decompress the compressed file:
tar -xjvf flock-2.0.3.en-GB.linux-i686.tar.bz2
2. Once you saved Flock, extract the file where you want the program to be located. I did it at /home/fabian/Software/flock
3. At this very moment you should be able to run Flock just by executing the /flock/flock-browser file, but you won’t have any shotcut to it and won’t be able to show flash content.
4. Next step is to get Adobe Flash Player from its official download page at Adobe.com. Select the .tar.gz file for Linux and save it in your computer. You can use the command as follows to decompress the file:
gzip -d install_flash_player_10_linux.tar.gz
tar -xvf install_flash_player_10_linux.tar
5. Open the file you’ve just download and extract the libflashplayer.so file to /flock/plugins/ for enabling the flash player. It also works if you extract it to /home/user/.flock/plugins
6. The previous step should be enough for making everything work fine, but truth is that Flock will crash. As soon as you load any flash content, the browser will close. This is because the libfreebl3.so library included by Mozilla doesn’t work properly. For solving this, you must go to the folder containing Flock (/folder-you-chose/flock/) and delete the libfreebl3.so file. This will foce the application to use the file included by Fedora, located at /lib/libfreebl3.so, so it won’t crash. This is enough for making Flock play flash content. Next steps will show you how to add nice shortcuts to your desktop.
7. Right flick the Applications menu at the GNOME panel. Select Edit menus. At Aplications -> Internet select New Item. Type: Aplication;
Name: Flock;
Location: /folder-you-chose/flock/flock-browser;
Comment: The social web browser (that’s optional, of course).
About the icon, I suggest this one.

Finally, click OK and you’re done, Flock will be at your applications menu. For creating shortcuts on the GNOME panels or desktop, just drag and drop the entry you’ve just created.
Create a repository in SVN of Linux
You can run the following command:
svnadmin create $repository-name
then the system will create a folder in your current directory named $repository-name.
Suppose the absolute path of the folder created above is,
e.g. /home/yourname/svn/test,
and the URL of the server is,
e.g. www.example.com
You can check out this repository using the command as follows:
svn co svn://www.example.com/home/yourname/svn/test
if you are on the same server, you can use the following command:
svn co file:///home/yourname/svn/test
svnadmin create $repository-name
then the system will create a folder in your current directory named $repository-name.
Suppose the absolute path of the folder created above is,
e.g. /home/yourname/svn/test,
and the URL of the server is,
e.g. www.example.com
You can check out this repository using the command as follows:
svn co svn://www.example.com/home/yourname/svn/test
if you are on the same server, you can use the following command:
svn co file:///home/yourname/svn/test
Wednesday, July 30, 2008
Fedora8系统Gnome桌面环境下安装EVA QQ
1 安装EVA所依赖的开发包:
sudo yum install qt qt-devel kdelibs kdelibs-apidocs kdelibs-devel arts arts-devel
2 解压缩eva(不一定要把安装文件移动到这个位置,其他位置也可以)
mv ~/eva-20080127_1.tar.bz2 /usr/local/src/
tar xvjf /usr/local/src/eva-20080127_1.tar.bz2
cd /usr/local/src/eva
3 开始配置
sudo ./configure --prefix=/usr/local/QQ --with-qt-dir=/usr/lib/qt-3.3/ --with-qt-includes=/usr/lib/qt-3.3/include/ --with-qt-libraries=/usr/lib/qt-3.3/lib/
4 编译、安装
sudo make
sudo make install
这样就可以到/usr/local/QQ/bin下找到eva程序,运行,就可以登陆QQ了。
由于eva是为kde设计的,所以在gnome下面运行会有错误提示。
QQ本身做得也必是很完善,中文的字体显示都有问题,所以实在是不好用。
sudo yum install qt qt-devel kdelibs kdelibs-apidocs kdelibs-devel arts arts-devel
2 解压缩eva(不一定要把安装文件移动到这个位置,其他位置也可以)
mv ~/eva-20080127_1.tar.bz2 /usr/local/src/
tar xvjf /usr/local/src/eva-20080127_1.tar.bz2
cd /usr/local/src/eva
3 开始配置
sudo ./configure --prefix=/usr/local/QQ --with-qt-dir=/usr/lib/qt-3.3/ --with-qt-includes=/usr/lib/qt-3.3/include/ --with-qt-libraries=/usr/lib/qt-3.3/lib/
4 编译、安装
sudo make
sudo make install
这样就可以到/usr/local/QQ/bin下找到eva程序,运行,就可以登陆QQ了。
由于eva是为kde设计的,所以在gnome下面运行会有错误提示。
QQ本身做得也必是很完善,中文的字体显示都有问题,所以实在是不好用。
install JRE on Firefox (Fedora 8)
sudo rpm -iv jre-6u2-linux-i586.rpm
sudo ln -s /usr/java/jre1.6.0_07/plugin/i386/ns7/libjavaplugin_oji.so /usr/lib/firefox-2.0.0.16/plugins/
sudo ln -s /usr/java/jre1.6.0_07/plugin/i386/ns7/libjavaplugin_oji.so /usr/lib/mozilla/plugins
sudo ln -s /usr/java/jre1.6.0_07/plugin/i386/ns7/libjavaplugin_oji.so /usr/lib/firefox-2.0.0.16/plugins/
sudo ln -s /usr/java/jre1.6.0_07/plugin/i386/ns7/libjavaplugin_oji.so /usr/lib/mozilla/plugins
use sudo without password
有时候我们只需要执行一条root权限的命令也要su到root,是不是有些不方便?这时可以用sudo代替
Fedora默认新建的用户不在sudo组,需要编辑/etc/sudoers文件将用户加入,该文件只能使用visudo命令,首先需要切换到root
在文件末尾加上下面的一行:
yourUserName ALL=(ALL) NOPASSWD:ALL
Upgrade to firefox 3 on Fedora 8
wget http://rpms.famillecollet.com/remi-release-8.rpm
sudo rpm -Uvh remi-release-8.rpm
sudo yum --enable remi update firefox
sudo rpm -Uvh remi-release-8.rpm
sudo yum --enable remi update firefox
Friday, July 25, 2008
Fedora8 change start mode: text or graphic mode
edit file /etc/inittab
at the beginning of the file:
# if graphic mode
id:5:initdefault:
# if text mode
id:3:initdefault:
at the beginning of the file:
# if graphic mode
id:5:initdefault:
# if text mode
id:3:initdefault:
gnome-terminal: set environment variables
The gnome-terminal does not automatically load the .bash_profile when it is opened. If you want to load .bash_profile you can click the gnome-terminal's menu "Edit--> Profiles..... --> Edit(Default Profile) --> Title and Command --> Run command as a login shell". So when gnome-terminal starts it will load .bash_profile. Of course you can set some environment variables in .bash_profile.
How to use ssh without password
1.首先在client上建立public Key和private key,需要使用ssh-keygen命令
[user_name@localhost .ssh]# ssh-keygen –t rsa
Generating public/private rsa key pair.
Enter file in which to save the key (/user_name/.ssh/id_rsa):
Enter passphrase (empty for no passphrase): 按enter
Enter same passphrase again: 按enter
Your identification has been saved in /user_name/.ssh/id_rsa.
Your public key has been saved in /user_name/.ssh/id_rsa.pub.
The key fingerprint is:
e8:8a:5e:ae:c7:13:45:d0:81:cd:3f:e6:1e:f8:88:5a
root@localhost.localdomain
#這樣會產生 id_rsa和id_rsa.pub 二個檔案:前者是private key後者是:public key.
2.然后将Private Key 放在client上的宿主目录, 一般放在/user_name/.ssh/目录中, 并修改权限为user可读
3 最后,将Public Key 放在任何一个您想登陆主机server中的某user的宿主目录下的.ssh/子目录人证文档中,
执行more id_rsa.pub >> authorized_keys即可。
scp id_rsa.pub username@server_hostname:~/.ssh/ #把id_rsa.pub 放到您要連線電腦的帳號中的.ssh
#注意 ~/.ssh 預設是沒有的,有二個方面可以產生 :第一種是手動建立. 並把目錄屬性更改為 700, 第二種是先用手動ssh到別的主機 ,第一次會有 認證的訊息出來按yes之後 .ssh的目錄就會自己產生了
[user_name@localhost .ssh]# ssh-keygen –t rsa
Generating public/private rsa key pair.
Enter file in which to save the key (/user_name/.ssh/id_rsa):
Enter passphrase (empty for no passphrase): 按enter
Enter same passphrase again: 按enter
Your identification has been saved in /user_name/.ssh/id_rsa.
Your public key has been saved in /user_name/.ssh/id_rsa.pub.
The key fingerprint is:
e8:8a:5e:ae:c7:13:45:d0:81:cd:3f:e6:1e:f8:88:5a
root@localhost.localdomain
#這樣會產生 id_rsa和id_rsa.pub 二個檔案:前者是private key後者是:public key.
2.然后将Private Key 放在client上的宿主目录, 一般放在/user_name/.ssh/目录中, 并修改权限为user可读
3 最后,将Public Key 放在任何一个您想登陆主机server中的某user的宿主目录下的.ssh/子目录人证文档中,
执行more id_rsa.pub >> authorized_keys即可。
scp id_rsa.pub username@server_hostname:~/.ssh/ #把id_rsa.pub 放到您要連線電腦的帳號中的.ssh
#注意 ~/.ssh 預設是沒有的,有二個方面可以產生 :第一種是手動建立. 並把目錄屬性更改為 700, 第二種是先用手動ssh到別的主機 ,第一次會有 認證的訊息出來按yes之後 .ssh的目錄就會自己產生了
Subscribe to:
Posts (Atom)